3 More TH-VCO1 Modules and a Mixer to Make Them All Sing Together!
As already mentioned in the previous post, I got 11 PCB sets for the TH-VCO1. I decided to build 4 of them for my own rack. I also had to build a mixer module to utilize all the signal sources.
Almost Mass Production!
I had already built one TH-VCO1 so building the rest of them was pretty straightforward. I tried to avoid the issues I discovered with the first unit. Figuring out what to do next and where each component should go takes significant time so I decided to assemble all three at the same time. It did save time but was more frustrating because it took much longer to get anything ready.
 |
| Mass Production. Assembling all three units in parallel. |
 |
| This time I left out the IC socket. Now THAT340 and Tempco resistor fit nicely under the potentiometer board. |
 |
| I added some thermal compound under the Tempo resistor. I don't know if it is necessary because the first unit seems to be stable also without. |
 |
| I wasn't able to find all trimmers in correct form factor so had to use some creativity to make the VCO tuning possible from the back. Looks amateurish but works! |
 |
| Three new oscillators installed. |
The Mixer
Suddenly I had 6 oscillators but only 2 VCAs so a mixer was the most urgent module to build. The starting point for the module was that extra TH-VCO1 panel that I got when ordering the VCO PCBs. It had holes for 7 inputs/outputs and 6 pots.
Op-Amp based mixing amplifiers are so trivial that I could easily design one from scratch but as I was unsure how many inputs and outputs I need I ended up searching for some ideas from the net. I found this
Muff Wiggler Discussion and it seemed perfect for my needs. The mixer can be used as 6 to 1 mixer or two independent 3 to 1 mixers. I guess I would have ended to a similar schematic anyway but of course it made the build faster when I had the schematic and reference panel available.
The only problem was that it required 6 input jacks and 2 output jacks. Luckily I was able to squeeze one more jack into the panel.
 |
| Wiring of the mixer module in progress. Re-used an extra TH-VCO1 panel. Notice the extra input jack in the upper corner. |
Yet Another PCB Solution
I have been struggling with the PCB's with pretty much every module I have built so far. Designing and ordering a custom PCB means a lot of work and using a simple striped or dotted veroboard is painful if the circuit has more than 3 components. This time I tried slightly more advanced prototyping boards I had ordered from Ebay some time back. The design is brilliant. It features short strips and a ground connection arranged so that it's possible to connect all the standard DIP packaged ICs easily. I highly recommend these for all the small utility circuits and ad-hoc hacks!
 |
| Top side looks just like a regular veroboard. Here's the mixer with TL074 quad op-amp. The only jumper wires are the +12V and -12V power supply connections for the IC. If the IC wouldn't need a bi-polar supply it would be even clearer with zero jumper wires! |
 |
| Bottom side reveals the magic. Nice and clean prototype PCB. No need to cut traces or add any wires. Well, there's some groud connections but that's nothing compared to my previous builds with simpler prototyping PCBs. |
Here's an Ebay link to a similar board. The exact item I ordered has already gone away so I don't know if this particular item or seller is any good but at least the board looks similar to mine.
http://www.ebay.com/itm/10XDIY-Prototype-Paper-PCB-Universal-Experiment-Matrix-Circuit-Board-8-5x20cm-TB/352150193728?
I will definitely use these a lot in the future. It's perfect for simple op-amp utilities like amplifiers, attenuators, mixers, buffered multiples etc.
The Guinness World Record of Front Panel Confusion
As I was re-using a panel from a completely different module the layout turned out to be horrible. For a mixer it would make sense to have the input jack right next to the level pot for that input. Unfortunately that's not possible with this panel. I did my best to mark the inputs and pots so that it would be clear which pot affects which input but it's not intuitive at all. Even after several weeks of use I still find myself tweaking a wrong pot. But I'll just have to deal with that. It was so much easier to use the recycled panel than drill all the holes into a blank panel.
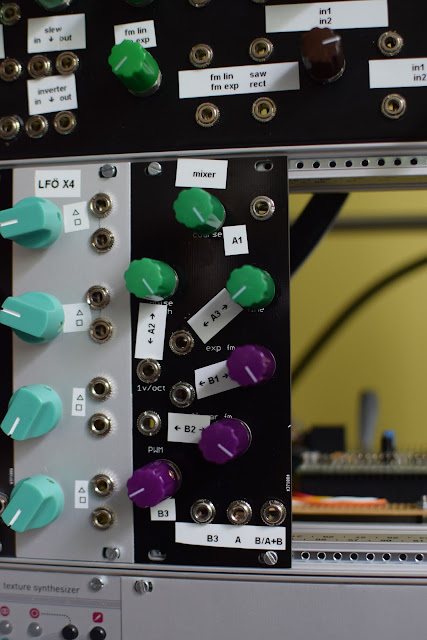 |
| Super messy panel. If only B/A+B output is in use all inputs are routed to that and the module works as a 6 to 1 mixer. If output A is connected it turns the module into two independent 3 to 1 mixers and A1-A3 will go to output A and B1-B3 to output B. |
The mixer works and I'm happy. Now I can do much more complex patches. My Doepfer DIY synth filters and VCA's have two inputs each so some mixing can be done there also but this separate mixer module gives much more freedom.
Time for a Youtube Channel!
Instagram is nice for quick and dirty demo videos but this time I decided to push the results to Youtube. Audio is still somewhat poor because I used the internal camera microphone but I try to get a more decent setup in the future. Anyway, here's 3 TH-VCO1s and the mixer module in action:
https://www.youtube.com/watch?v=VVyfbvUtgkQ


Comments
Post a Comment